By Matt Claiborne
(Originally written for submission to Good Old Boat, which went out of business concurrently with my hitting “send.” Oh, well.)
Am I the only sailor who spends hours on passage coming up with grand ways that things could be better? Days of chugging down the ICW or dark nights of pounding offshore provide lots of time to ponder. Why would anyone make a seat this uncomfortable, and why can’t I see a single thing out of this window? Maybe a trawler wouldn’t be so bad. Maybe I should’ve bought an RV. Oh, how the mind toils as the miles slowly pass.
Landfall eventually comes, but answers to life’s persistent questions do not. Occasionally, you may see a boat and say, “Oh, so that’s how they solved that!” But these ah-ha moments are few and far between, as most boats are more alike than different. It’s my observation that most boaters take what they are given, be it from the builder, tradesmen, or previous owners, and deal with it.
When we bought Dulcinea in 2019, she came with a new dodger and bimini that were perfectly adequate for day sailing and weekending. But as full-time, all-season liveaboards, constructing a full cockpit enclosure was one of our first projects. We looked at what others had done and built a perfectly adequate, looks-like-everyone-elses enclosure.
Four years later, it was time for some updates. With lessons learned from the first go, we dove into creating Version 2.0—the ultimate cockpit enclosure for the liveaboard cruiser. Could we improve the cockpit enclosure system, better our living space, and make the boat look better than before?

Who Needs a Boat Enclosure, Anyway?
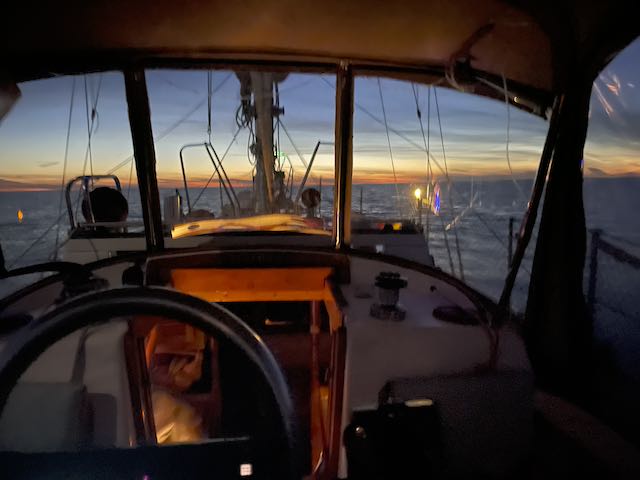
Many sailors are averse to enclosures, but this item is non-negotiable for us. We occasionally overwinter as far north as Virginia, and having a full enclosure makes our boat a four-season cruiser. Even when we go south, we appreciate (dare I say, need?) the enclosure for those bitter cold November mornings churning down the ICW. Being shielded from the wind and spray reduces fatigue on long trips. For day-to-day living, the enclosure is important because we, like most monohull sailors, live in a cave. The cockpit is our escape, so we spend as much time there as possible. An enclosure makes that possible year-round, rain or shine.
Enclosures come with problems, of course. They make it difficult to get in and out—who among us likes fiddling with those plastic zippers or getting them lined up on tight canvas? The plastic windows are easy to scratch and difficult to keep clean. Oh, and there are problems with the design. My biggest pet peeve is how much they can compromise visibility. I hate blind spots.
We completed our first enclosure and a host of other major upgrades within the first three months of owning Duclinea. The boat came with a beautiful new dodger and a functional bimini. So we did what most canvas shops would—we left the existing structures alone and added side curtains and a connector in the same color. Once the new canvas was hung, we cruised the Chesapeake in April. We could not have been happier with our new-to-us Cabo Rico or the enclosure we’d built.


But, as the miles slipped under the keel and years wore on, so did our canvas. The older Sunbrella began to mildew, and the white zippers were especially grungy and uncleanable. The dodger’s cheap plastic windows distorted with age.
However, flaws in the overall design bothered me more. The low dodger did not suit us—too much hunching and head banging. Its height made it so you could not stand and see forward. The bimini was too big, blocking the horizon when standing and making moving around the aft side decks impossible. And I hated how it looked like a covered wagon on the back of my boat. Was I about to die of dysentery on the Oregon Trail?
Perhaps most importantly, Chelsea the Adventure Terrier did not appreciate the enclosure for one big reason—she couldn’t see out the window from her bed. Chelsea gave the old system four paws down.
Improvising and Improving the Design for Your Sailboat Cockpit Enclosure
There’s an old pilot saying: When a warning light flashes, the oil pressure drops, or the fire bell chimes, the best course of action is to wind the clock. In other words, when the manure enters the air circulation system, the best course of action is to stop and think before jumping to conclusions or acting impulsively. This mindset has served me well in boating, and particularly when tackling big boat projects. Think it out, and then think again before doing anything stupid.
I took my time and searched for clever solutions to improve our cockpit living space. The majority of boats I saw were no different than what we had: standard dodgers, folding biminis, and side curtains to seal it all together. Simply adding a full-height dodger would not solve as many problems as I’d like.
A hard dodger was one solution, and a full doghouse would be dreamy. Visibility still being on my mind, I loved the idea of looking through real windows. My cruising friend Russell built a beautiful custom doghouse for his Peterson 44 Blue Highway. Gozzard Yachts built factory hard dodgers and tops that caught my eye. I even photoshopped one of theirs onto my Cabo Rico, and I was pretty pleased with the look. Alternatively, some folks fabricated welded aluminum or stainless frames, fixed structures upon which they strung their canvas and enclosures. These made very sturdy platforms, but most wound up being eyesores of the highest order.
I finally stumbled upon a blog that provided some new ideas. Sverre Bech-Sjothun, a fellow from Norway with a Beneteau 411, Selkie, thought outside the box and came up with a beautiful and unique canvas enclosure. The overall theme of his design was to have curved side curtains that could be opened wide and closed easily without reattaching the zippers each time. Revolutionary stuff!
There were many other benefits to his unique ‘ultimate high latitude enclosure.’ Each panel could be used independently, so the forward doors could be left on while the rear quarter panels removed, making the ultimate spray hood. The forward doors were enormous, making entry and exit as easy as possible. Instead of rolling up where they blocked the view and reduced headroom, the doors rolled aft and stood out of the way. Even better, his enclosure looked sleek and very un-covered wagon-like. Now we’re talking!
The Ultimate Boat Enclosure Design — Our Project Goals
Selkie’s enclosure had the most influence on our final product, but many modifications were necessary to suit it to our Cabo Rico. Among the many goals of our project, we wanted to:
- Improve visibility by reducing canvas and using better glass
- Have standing headroom throughout, with easier passage through the companionway
- Make entry and exit to the cockpit as easy as possible, with large doors (no more squeezing through half-opened zippers)
- Improve the overall aesthetics by ditching the boxy ‘covered wagon’ look
- Size canvas specifically to hold my semi-flexible solar panels
- Have a rigid structure—no more straps, no more wobble
- Allow walking around both aft side decks
- Access all sail controls whether the enclosure is up or down
- Be as waterproof and weatherproof as possible while also making it easy to ventilate and keep cool
- Keep it easy to remove all canvas and fold up the frames for storms or storage
- Minimize costs and fabrication time

A fiberglass dodger or full doghouse would be an ideal platform from which to build the rest of the structure, but I estimated the cost to be at least $5,000, assuming I could complete the work myself. My bigger concern was time — a project like that could spiral out of control as one thing led to another.
Lucy, my co-captain, has a formula for working out how long a boat project will take. You make your best estimate, then double the quantity and change the time unit to the next largest. According to her math, a one-hour project will take about two days. A two-week haul out will last approximately four months.
After eight years of cruising life, her method gives the best results of any we’ve found. That means that building a hard dodger, by my best estimates and corrected with Lucy’s math, would likely take me about six years. Another rule of Lucy’s math: If the estimates are in months or years, it’s best to call a broker and sell the boat.
We wanted to go cruising, not be covered in fiberglass dust all summer so, alas, the fiberglass doghouse of my dreams would not be happening. Whatever we did, it would have to be a canvas enclosure built on standard one-inch stainless tubing. But how could we make such a structure robust and aesthetically pleasing enough to suffice? In an especially resource-conscious move, I decided that I would reuse and “upcycle” as much of the old as we could. I had a large three-bow bimini and two-bow dodger to work with, plus tons of stainless hardware that was perfectly good.
I started drawing up designs and came up with a plan. The dodger would be raised by about 12 inches and fixed with standard angle bases and extra supports. The bimini frame would be reshaped to match the pitch of the new dodger, for the new enclosure design, sized for my solar panels, and to give better access to the side decks. By cutting the existing tubing to new lengths and adding a few new fittings, I completed the frames for under $500.
Next up were the canvas and clear plastic pieces, which I knew could be pricy. One thing I would not compromise, however, was forward visibility. Hard polycarbonate was the only way to go for the dodger windows this time, but I was able to make all three windows from only one full sheet. The side windows needed to roll, so I went with O’Sea scratch-resistant clear vinyl. Again, by carefully calculating the area, I could use one full sheet per side. That left only the small rear door panel, and I found Regalite 20-gauge vinyl sold in quarter sheets that fit perfectly.
For canvas, we upgraded to Seamark, which has normal Sunbrella on the outside and vinyl on the inside. It’s completely waterproof, so we hope it will be easier to keep clean and mildew-free. We opted for a classy Toast Tweed color, which has some texture but still matches our plain Toast sailcovers. Using black zippers this time would hopefully hide some grime, too.

I had many more things I wanted to do with the project, but I had at last figured out a basic design that minimized time and cost and accomplished most of our goals.
Sewing It All Up
With the plan drawn up, we booked a dock and began construction. We took rough measurements, ordered materials, and stripped the old canvas and frames off Dulcinea. She looked naked and afraid, sitting at the dock in New Bern, North Carolina.

First up was cutting the stainless frames. Those first cuts, when you dive into a project that will forever alter your boat, are brutal. Perhaps I’m overstating things, considering it’s a canvas project, but there was no going back after that. To double-check my measuring, I hung the frames from the boom temporarily to make sure the heights and clearances would work.
The dodger frame was the first on the agenda. I installed the angle fittings and new supports. Once the frame was mounted, I templated the new top and got out our trusty but old Sailrite LSZ-1 sewing machine. I opted to make a California-style dodger with completely removable windows. This allowed me to make each window panel separately, which was easier than making the whole thing in one piece. The most helpful resources were the excellent how-to videos produced by Sailrite.

I was concerned about sewing the polycarbonate windows, but it was easier than I expected. By referencing the manufacturer’s fabrication instructions, I purchased the recommended size and style of needle for my machine, Groz Beckert Tripoint size 22s. This made the job progress smoothly, and my Sailrite had no problem punching through the thick construction so long as I went nice and slow.
The bimini frame came together in a similar fashion, but the new complex shape made templating the canvas considerably harder. The new frame has two bows, with the front edge connected to the dodger like an integrated connector. The final shape is wild, with long flaps that extend all the way down each side of the dodger. This allows for only one zipper to be used from front to back and means that we can open and close the doors without re-starting a zipper. The only zipper fiddling happens when a panel comes off. It’s crazy looking, but it works great.
With the dodger complete and the bimini top in place, all that was left was to template the side curtains. Their unusual shape meant I had to template each complete side and then divide it into the two curtains.
If there was one lesson from my first enclosure, it was that the big motions were easy. It’s the small details that can make or break the usability of the canvas. For example, every zipper must have a flange, a flap that covers the zipper from above and ensures that rainwater will run off and not down and through the zipper. We also needed to create zip-off winch covers to ensure we could sail with the canvas up or down.
Attaching the flexible solar panels was the last hurdle. The panels are held in place by sewn-on velcro lapels. So far, the system has worked perfectly—they’re very securely attached, having held up in 70-knot gusts with no problems (Chesapeake Bay summer thunderstorms can pack a punch!), and they’re easy to remove if needed. Wires are hidden under their own lapels to keep them out of sight. The design for the lapels came from Rod Collins over at Marine How To.
My final brainstorm was to sew webbing straps to the underside, like the MOLLE system used on tactical gear. I could hang lights and little things that I always have floating around the cockpit—my plastic air horn, soft shackles, sunglasses, pocket knives, and a million other little things.

When discussing boat building, cruising legend Paul Shard of Distant Shores once mused that you must build three. The first one you give to your enemy, the second to a friend, and the third one you can keep for yourself because you’ve got it right by then. If that’s true, I suppose I should give this enclosure to a friend.
Instead, I will happily use it for a few years. So far, it has served us well from Maine to the Bahamas and back again. It’s become one of our favorite boat upgrades. Are there more improvements to be made? You bet. After a few more long passages, I’m sure I’ll have dreamed up plenty of ways to make my third enclosure epic. Or maybe I’ll just buy a pilothouse next time.

Project Stats
- Begin date — March 16, 2023
- End date — April 27, 2023
- Thick-wall stainless tubing and assorted fittings, $424
- 10 yards Seamark for dodger and bimini tops in Toast Tweed, $419
- 1 sheet of Tuffak Makrolon VR 40-gauge polycarbonate for dodger windows, $226
- Vinyl for enclosure (2 full sheets of O’Sea 40-ga + 1 quarter-sheet of Regalite 20-ga) $529
- Binding, zippers, and notions, $1,204
- Total project cost: $2,802


Bio
Matt Claiborne lives, works, and travels full-time aboard his good old boat, a 1985 Cabo Rico 38 named Dulcinea. His crewmates consist of his co-captain, Lucy, and barking adventure terrier, Chelsea. You'll find them hopping up and down the East Coast with the seasons, enjoying the cruising life, and trying their best not to run aground too often.
Leave a Reply